• home
  • about
  • services
    • apartmentjeanie
    • photojeanie
    • partyjeanie
    • closetjeanie
    • happy home
  • galleries
    • apartment
    • photo
    • party
  • testimonials
  • press
  • blog
  • get started

like sugar, epoxy resin makes everything better

January 26, 2011 by jeanie 4 Comments

I like to share, contradictory to what my astrological sign states or anyone’s spoon that might find its way in my ice cream sundae, I really do enjoy exchanging information, ideas and experiences with anyone seeking my expertise.

Although it may seem foolhardy to provide detailed instruction how to create the candy coating deliciousness that is epoxy resin finish – I am feeling charitable and also slightly distracted by the Jets/Steelers game, so this is a freebie that requires minimal mental participation on my behalf.

If you need some inspiration or additional visual encouragement, please hop, skip and jump over the apartmentjeanie Etsy shop.


IMG_9555_2 yellow_mirror_-rope_detail

Creating epoxy resin frames

Materials needed:

  • Frame
  • Paint
  • Glitter (if you want to add some additional sparkle)
  • Mod podge or watered down white glue
  • Clear spray paint
  • Primer
  • Epoxy resin mix
  • 2 Clean measuring/mixing containers
  • Few small sponge brushes
  • Paint stirrer
  • Chopsticks, Popsicle sticks or bamboo skewer
  • Small torch blower
  • Latex gloves
  • 4 unopened soda cans
  • Sand paper

Aqua_round_mirror

How to:

1. Clean then prime the picture frame.  Cover all non-wood pieces (hooks, wire etc) w/ blue tape.

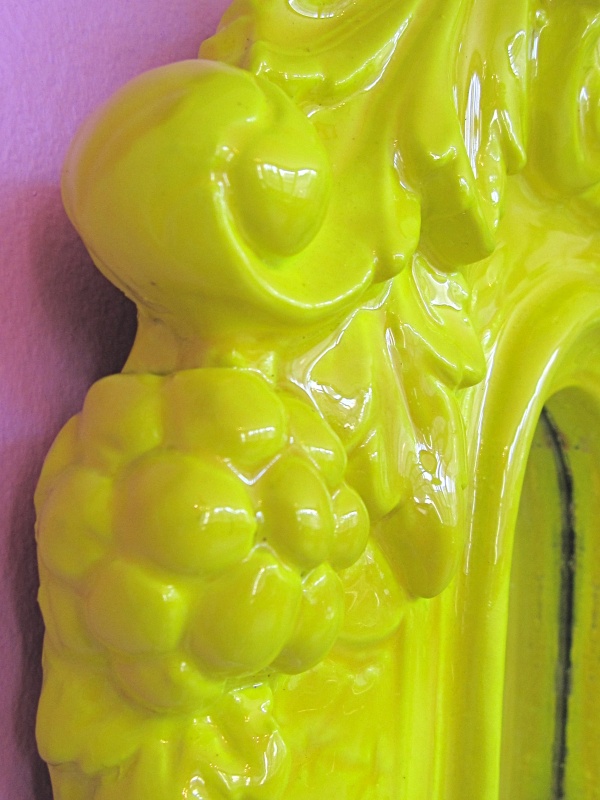
2. Paint (spray paint is my preferred method) the frame until the front, sides and interior window are thoroughly covered.  The back should have a light spray, but doesn’t require the same opaque coverage.

If you are applying glitter continue w/ stop #3, if not skip to step #5

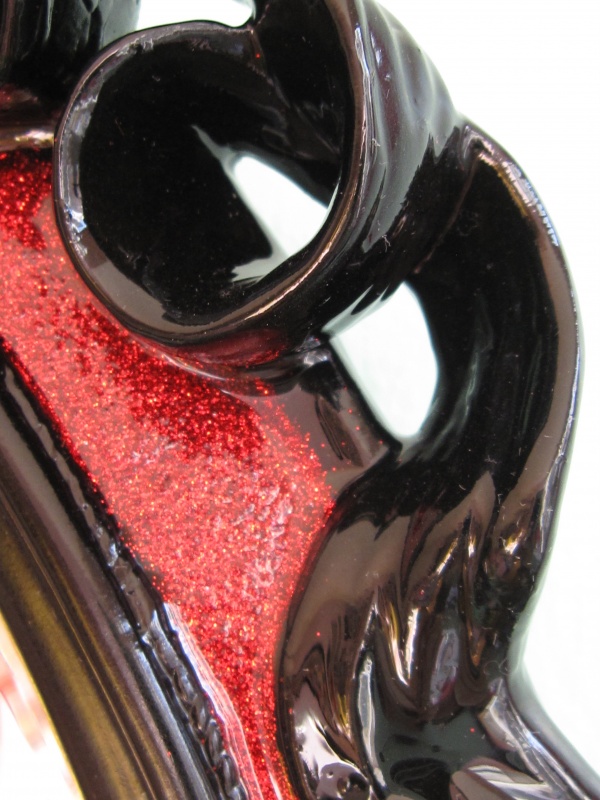
3. Once paint has thoroughly dried, cover frame w/ glue adhesive then add glitter.  Work in small sections.  Wait for glue to dry before shaking off excessive glitter.  Apply glitter liberally, but neatly.  I find that the Martha Stewart ultra fine glitter works the best.

4. Once the excess glitter has been removed and any holes have been covered, spray the entire frame w/ the clear spray paint.  This will keep the glitter secure when adding the epoxy resin. Let sit for 1 day.

5. Set the frame for the epoxy resin application in a well ventilated, but free of dust and airborne debris.  Cover the table w/ Kraft paper then w/ a layer of wax or parchment paper above.  Do not place frame too close to the edge of the workspace.  (Tie back loose hair, wear latex gloves and wear clothing that can be ruined.)  Place the 4 soda cans underneath each corner of the frame – make sure the weight is balanced.

6. Follow the instructions on the epoxy resin package EXACTLY.

7. Pour the thoroughly mixed epoxy resin slowly and evenly over the top of the frame.  The solution will pour down the sides of the frame and in the window opening.  Do not leave any epoxy in the mixing container – if it sits for more than a few minutes, it will get very hot and cloudy and unusable.  Using the foam brush, move the epoxy to cover the entire surface.  There may be holes so continue to go over the whole frame w/ the brush; more than 1 brush may be required.  Work quickly b/c the solution will start to get gummy.  Once the exterior of the frame is completely covered, take the chopstick and start scraping along the bottom edge of the frame to remove the dripping epoxy.  Continue to do this for several minutes.  The more vigilant, the less to sand later.

8. Air bubbles start forming on the surface. (If this is a glitter finish this next step isn’t as critical, but I do recommend that you remove the air bubbles if you want a professional looking product.)  Using a handheld blow torch (the style used in kitchens for crème brulee works perfectly fine) slowly and CAREFULLY pass over the frame to remove the air bubbles.  Continue to do this until all visible bubbles have been popped.

9. Go over the bottom again w/ a fresh stick to scrape drips.

10. If possible cover the entire frame w/ an airtight container.

11. After 1 hour try to scrape any more drips if formed.

12. Leave untouched for 72 hours, seriously.

13. Once the curing process is complete, wearing latex gloves, sand all   bumps, drips or streaks of epoxy resin off the back and window opening.

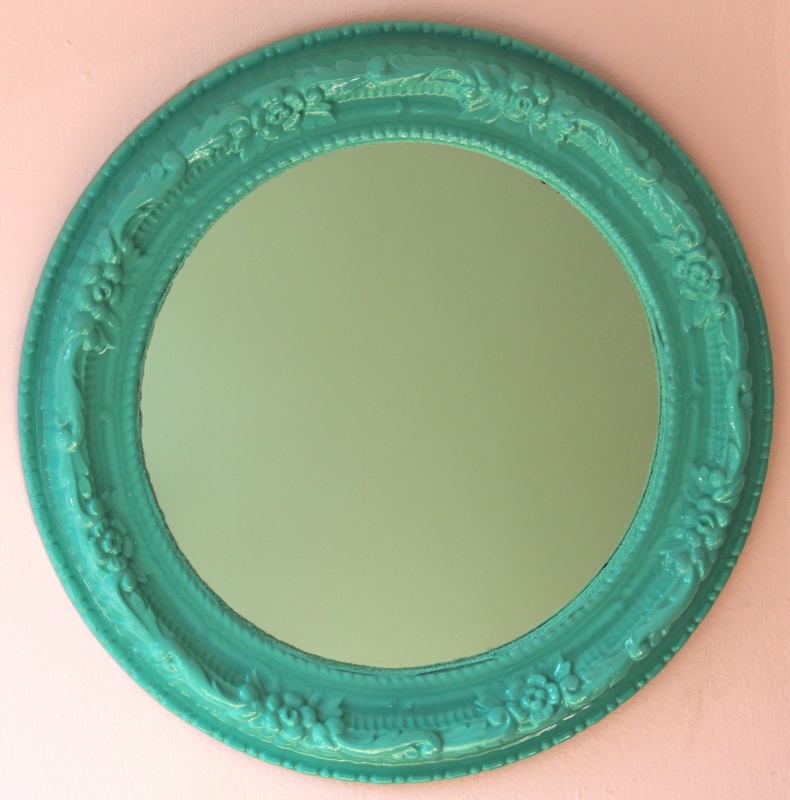
14. Admire the gorgeous piece of wall candy you just created.   Your home will thank you.

If you send me photos of your epoxy resin achievements, I would love to post them.

Get crafty.

xxoo.

Share This:

Filed Under: apartmentjeanie, how-to Tagged With: apartmentjeanie, d.i.y project, display, epoxy resin, Etsy, home decor, how-to, interior design

Comments

  1. Deirdre says

    May 20, 2011 at 7:45 am

    What an amazing job you did with those frames! I have a question & you seem like the person that might finally have an answer for me. lol

    I saw a photographer’s pieces at an art gallery out in Cali & I love what they did with it so much I’m trying to recreate that look with my photos. They blew up their prints & glued it to some kind of hard board & then covered it with a highly glossy epoxy type substance that was level and had no brush strokes at all. They looked aboslutely amazing! I’m so sick of picture frames so I want to try this but I can’t seem to figure out how to do it.

    I’ve tried mod podge on poster board and that didn’t work; you could see the brush strokes & the board started to eventually curl.

    If there is anything you can suggest it would be truly appreciated! Thank you for your time. =)

    Reply
    • jeanie engelbach says

      May 20, 2011 at 9:35 am

      hey deirdre,
      thank you so much for reading and then asking me for assistance! you did find the right person to answer your question. although i totally love ornate picture frames, this concept you presented sounds interesting especially if you did it to a collection of images. you definitely need to use a source stronger than poster board, perhaps foam core or gator board would work, but if you are looking longevity, i suggest wood – you could even wrap the image around the edges. you need to use epoxy resin for this project in order to seal it and create the effect you described. the image needs to be cured to protect it from the epoxy seeping underneath and keeping it opaque, a coat of mod podge or clear spray paint will seal the image. i am not sure how you intend to enlarge your images – a printer or professional photo developing, if you are self printing, you really need to coat thoroughly. follow the epoxy resin application instructions from this post and make sure the board is raised so you can clear the dippings off the bottom edges which saves a ton of time from sanding later.
      thanks again for reading & if you are on fb, please check out the https://www.facebook.com/apartmentjeanie
      please let me know if you should have more questions.
      good luck & would love to see the finished project!
      xxoo.

      Reply
  2. Susan says

    September 24, 2012 at 11:28 am

    Thank you for this very informative blog entry – I am going to try my hand with a resin project this weekend and all of your tips are really helpful!

    Reply
  3. jeanie says

    September 24, 2012 at 11:44 am

    Susan – it’s pretty easy, just don’t rush through it. Can’t wait to see your finished work of art!

    Reply

Leave a Reply Cancel reply

Your email address will not be published. Required fields are marked *

search

browse by category

  • apartmentjeanie
  • closetjeanie
  • how-to
  • lifestyle
  • partyjeanie
  • photojeanie
  • travel
  • Uncategorized
Tweets by @apartmentjeanie
Visit Ronit Abraham Delson's profile on Pinterest.
"My apartment has never looked so organized! Jeanie is a genius organizer who also has a wonderful aesthetic eye. My apartment is now both organized and beautiful! Looking forward to tackling future projects with Jeanie.”- Laurie Blitzer

subscribe & save with a monthly visit from the jeanie of your choice! learn more

“With a firm but gentle hand Jeanie guided me through deciding what should stay and what should go and then she swiftly organized everything! In one afternoon she did what I was unable to accomplish in 3 years. Plus, so much more! Money well spent is an understatement!”-Wendy Goldberg

from the blog

  • Bookworm Organizational Tips
  • Working with vertical space
  • Over The Rainbow
  • what’s happening in nyc this week!
  • through the lens of a professional organizer

get in touch

now is the time
email info@photojeanie.com
call (917) 828-7197

Copyright © 2025 · Genesis Framework · WordPress · Log in

apartmentjeanie

The past month, I have gained in one area and lost The past month, I have gained in one area and lost in the other and I need to reverse this trend.

While speaking to the 🐐of health coaches, @victoria_dorsano (seriously she is brilliant, insightful and incredibly knowledgeable) she asked me 2 simple questions.

1️⃣ does it help me make money 
2️⃣ does it help me lose weight 

And now every task I approach and every action I take until the numbers I want are achieved will be filtered through this lens.

Much like what we at apartmentjeanie do for our clients’ spaces, these 2 criteria will help streamline my day and allow me to focus on my 🥅 

If you want to learn more about the magic of @victoria_dorsano or our services, hit me up.
 

#proorganizer #professionalorganizers #clutterfree #livebetterorganized #justdoit #victoriadorsano
Nothing beats an organized space 😋 #organizat Nothing beats an organized space 😋 

#organization #interiordesign #nyc #homedecore #designdeinteriores
Step into Jeanie’s world 🏠✨ From the founde Step into Jeanie’s world 🏠✨ From the founder’s desk to her personal oasis. Jeanie’s apartment transformation is a journey of creativity and style. Every item, system, and piece of decor has its own story, especially her chic repurposed furniture and unique collections. 

#nyc #homeinspo #interiordesign #interiordecor #homeorganization #homedecorideas #apartmentjeanie #nycliving
Clean + organized space = good vibes & nothing els Clean + organized space = good vibes & nothing else 

#homedecor #organized #organization #interiordesign
For our circus-loving client, we made sure her hom For our circus-loving client, we made sure her home’s as ready to tumble and twirl as she is. 🎪 Think open living spaces with quick-shift tables and shelves that shout ‘roller coaster fun’. The bedroom? A cozy starlit nook beneath navy skies and tall ceilings making her bedroom feel like the night sky.🌜 It’s not just a home; it’s her personal big top.

📷 @rikkisnyder 

#apartment #apartmentdecor #apartmentliving #apartmentdesign #decor #decorating #interiordesign #interiordecor #nyc #nyclife #nycliving #apartmentmakeover
Sorry, we don’t make the rules! 😉 #nyc #apar Sorry, we don’t make the rules! 😉

#nyc #apartmentdecor #interiordesign #interiordecor #apartmentdesign #apartmentliving
Turning your clutter into creativity! At apartment Turning your clutter into creativity! At apartmentjeanie, we craft personalized galleries out of everyday items, making storage a work of art that reflects your unique style ✨ 

#nycliving #apartmentdecor #homedecor #nyc #interiordesign #interiordecor #interiorstyling #livingroom #livingroomdecor #organization
Closet makeover check🤪 #nyc #interiordesigner Closet makeover check🤪 

#nyc #interiordesigner #homedecor #homeinspo #beforeandafter
THURSDAY at 9:30am, I am going to make my LIVE 📺 debut on @pix11news! 

We’ll be discussing closet cleaning and organizing tips, how to maximize the space and whatever the morning anchors ask of me.  After all, I AM an expert 😉

Tune in at 9:30am and maybe learn something new!
Where every piece tells a story ✨ With apartmen Where every piece tells a story ✨ 
With apartmentjeanie, we redefine home organization by turning your cherished belongings into focal points of beauty and functionality. From hanging jewelry as wall art to elevating luxury bags on shelves and repurposing mementos for practical use, we creatively maximize every inch of your space, ensuring it reflects your unique personality. Let us bring the art of you into your home’s design.🤍

#nyc #homeinspo #interiordesign #interiordecor #homeorganization #homedecorideas #apartmentjeanie #nycliving
The end result >>> #nyc #homeinspo #interiordesi The end result >>> 

#nyc #homeinspo #interiordesign #homedecor #beforeandafter
Our latest fix at apartmentjeanie has this soon-to Our latest fix at apartmentjeanie has this soon-to-be mom covered! 🍼🤗

Outfits and shoes are set for easy grabs, while heels wait on high for special outings. Jewels? Perfectly placed near the door for a quick sparkle check. 🕶️💍 We optimized space with smart storage for long gowns and a safe for valuables, swapping bulky shelves for sleek hooks. Making every day a bit smoother, one stylish, organized corner at a time!

#nyc #homeinspo #interiordesign #interiordecor #homeorganization #homedecorideas #apartmentjeanie #nycliving
That boss lady feeling of turning your apartment i That boss lady feeling of turning your apartment into the home of your dreams ✨ are you ready to fall in love with your space and perhaps never want to leave again?! 

-

#apartmentjeanie #nyc #homeinspo #interiordesign #interiordecor #homeorganization #homedecorideas
Name a better feeling than walking into a clean + Name a better feeling than walking into a clean + hassle-free bathroom, we’ll wait ✨ imagine going about your daily routine with everything at your fingertips - from neatly arranged medicine cabinet categories to efficiently stored bulk items in drawers! 

Add the simplicity of a clean white bathroom, and you’ve got your own little sanctuary. 🤗

-

#homeorganization #homeorganizer #organization #homedecor #homedesign #interiordesign
You just moved into a rental, you want to make it You just moved into a rental, you want to make it your own, and you don’t know where to begin. That’s where we come in! 😇 

Jeanie transformed this empty space into the apartment of her dreams! Her vision to personalize the open floor plan led to a creative solution; she curated a beautiful display of kitchen + dining collections that not only camouflaged the mundane but also made the space her own! 

Let us capture your vision and make your space authentically YOU 💛✨🌈 

-

#homedecor #interiordesign #rental #apartmentdecor #homedesign #homeinterior #newyork
You don’t cut your own hair, do you? 💇‍♀️
There’s no shame in calling a professional for tasks you don’t have the skill, time, or ✨desire✨ to do!

apartmentjeanie is here to help you:

🍳 Make awkward cookware and appliances take up less space and be more accessible!

🛋️ Rearrange your existing furniture to make the biggest impact on your usable space — without breaking the bank!

🔌 Organize junk drawers and messy utility (or clothing!) closets!

📝 Reclaim your dining tables & countertops by creating systems for WFH offices and incoming paperwork!

#funnymemes #funnyvideos #paperwork #office #officespace #apartment #oragnized #closet #nyc #married #couplegoals #organization #organizationideas #diy #homeadvice #apartmentliving #apartmentdecor #decoration #furniture #wallpaper #mcm #mcmfurniture
Do it differently in 2024! 1. Add shelves if you Do it differently in 2024!

1. Add shelves if you need them - shorter stacks  make life easier! 🥞

2. Keep the appropriate seasonal items accessible! ☃️

3. Buy enough SLIM hangers! 🤙🏼

#apartment #closet #closetorganization #closetgoals #organized #organization #tips #tipsandtricks #beforeandafter #timelapse #clothing #clothes #fashion #apartmenttherapy #home #momlife
It’s never too late to make-up for all the items It’s never too late to make-up for all the items you never ✨really✨ unpacked! No matter how long ago that move was, we don’t ever 💋💄 and tell!

#makeup #makeuptutorial #makeupaddict #makeupaddict #organizer #bathroom #bathroomdesign #interior #interiordecor #organization #thehomeedit #apartmenttherapy #apartments #nyc #storagesolutions #vanity #makeuplooks #makeuplover
Decanting is more important to some clients than o Decanting is more important to some clients than others 😅🤣

For me, the gold lid spice jars from @thecontainerstore are a necessity for open shelving. 

But the systems in place in YOUR home only have to work for YOU! Not everything has to be Instagram-perfect, or entirely uniform if you can access things easily, everyone in the house knows where to put things back, and the end result isn’t visually distracting to you. 

When would we opt for an upgrade? ✨

➡️ The original packaging does a poor job. 
A great example is brown sugar — it needs moisture and an airtight seal to not dry out, but once the bag is open, the packaging doesn’t preserve it properly. 

➡️ It doesn’t fit in the cabinet where you store it. 
Top culprit? Cereal boxes. Coming in so many sizes, sometimes they are too tall for your cupboard. If you store the one tall box away from the rest of the cereals, it becomes much harder for your family to know where to find it, and even harder for them to remember where to put it back correctly. 

➡️ You hate how it looks!
Certain things need to live in the open for ease of use! Think cooking utensils, salt, and pepper. Investing in a great looking crock or grinder is an easy scenario to justify, but this can apply for any areas visible or behind closed doors. How it “looks” is part of organizational preference as long as the system you have created isn’t being compromised!

#funny #funnyvideos #funnymeme #meme #viral #richgirl #hallandoates #yourearichgirl #organizedmoms #organization #organized #clean #kitchen #kitchendesign #kitchendecor #tips #tipstuesday #tuesday #decant #decanting #spicejars #spices #spiceorganization
🙌🏻 How is it possible to keep everything, an 🙌🏻 How is it possible to keep everything, and make it look so empty?! 

Here’s how we make it look so easy:

♻️ Recycle those cardboard boxes!
Removing external packaging on things like toothpaste, appliances, paper towels, and new linens helps them to condense into smaller drawers, fold uniformly, and fit on shelves in the areas you define for their storage. 

Taking items out of their packaging also increases your likelihood to use what you have by removing a barrier of entry to access items when they’re needed!

🎁 Upgrade your storage containers!
Large, opaque wicker baskets make it hard to see items, and don’t offer enough compartmentalization for the number of toiletry categories we needed to store. This is asking for a pile up in aisle 5! 

Especially when lighting is tough in closets, opt for clear! And always look for stacking! We added drawers for a couple key categories like: Personal Grooming, Dental, Skincare, Makeup, & Haircare! 

🛠️ Use the right tools for each job!
We love the drawers! But they aren’t appropriate for those 20” deep corners, where you can see items pile up in the before shot. Spinners are much better - and also make reaching all the cleansers & hair accessories a breeze! 

Before making any product purchases, think ahead about your limitations and plan for systems around any existing structures you cannot change for your current project’s budget!

#organization #organizing #organizer #homedesign #home  #closetorganization #closetgoals #closet #apartment #apartmentliving #apartmenttherapy #howto
Load More... Follow on Instagram